So we were asked to create a Hotglue site. But not just a standard Hotglue webpage. One of the most vulgar and seizure inducing webpages you'd ever laid your eyes upon. The premise of this exercise (if you could call it that!) was to get to grips with the basics of using Hotglue so as to prepare us for when we create our own portfolios on it. Effectively, the portfolio you are viewing this on right now.
So, what did I make? I made something truly vulgar. It was a simple Hotglue site, which asked one question. 'Do you like Doritos' (the famous brand of corn based snack). It contained an animated GIF of a spinning Dorito, 'He-Man', and a 'yes' or 'no' function. Not to mention these buttons also flashed violently with to different colours. If you clicked yes, it would take you to a page with extremely ugly Comic Sans typeface, a multi-colour GIF, and more spinning Doritos. And if you clicked no, well, you'd just be greeted with page that contains a sad crying Dorito. I do question why I made this 'website'.
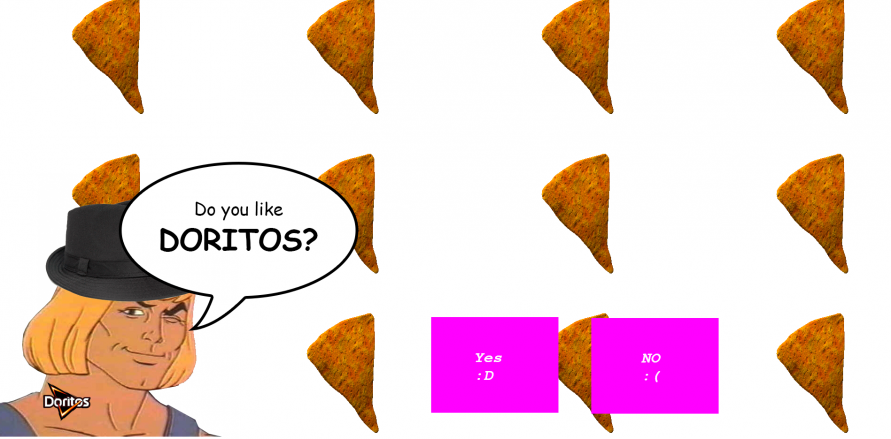
What we made.
'Yes' page.
'No' page.
Introduction to HOTGLUE
What is HOTGLUE?
HOTGLUE is a content manipulation system. Or, a visual tool for creating web pages within the browser. It tries to emulate a 'scrapbook' type feel, or at least, that's the style it encourages users to adhere to, as when you actually use Hotglue, you will find that it isn't quite so easy to create visually symmetrical, structured and aligned webpages. To make a Hotglue website, I signed up at hotglue.me. Once I did that, it granted me my Hotglue webpage.
Hotglue makes it easy to edit and add content to web pages. What's important to remember is that if you want to edit a web page, you must first change the page URL very slightly. By default, you will be allowed to view and interactive with the webpage, but not edit and adjust it. If you want to do so, all you must do is add '/edit' to the end of the URL:
-->
HOTGLUE works in a very simple manner. It utilises a 'drag and drop' system. You can create text boxes, upload images, change the background colour and much more. Say you wanted to create a text box. You can single click on a part of the screen in which nothing is located, click 'add a new text object' and you're done. You now have a text box that you can drag, make larger or smaller, longer or thicker, and of course, write text in. When in the text box you can adjust certain aspects such as the colour of the text box, the opacity of it, the text typeface or style, make the text bigger or smaller, and much more (this is effectively how I created my text in the website shown above):

I uploaded my images by dragging them from windows, straight on to my Hotglue page. It will immediately upload them. Just like text boxes, you can drag and resize your images. That is the concept with virtually any object within the Hotglue environment. The majority of options for creating a new object or adjusting the background image or colour or even locating to other pages or revisiting previous revisions can be found by double clicking on the page:
Hotglue allows you to create multiple web pages. You can organise, travel from and to, and create new webpages by double clicking, and then clicking on the 'list all pages' icon. This is what allowed me to create and navigate through multiple pages.
The way in which I turned the background in to a series of animated GIF's was by uploading a background image which you can also find in the double click menu:
Working on my portfolio.
Creating my new serious portfolio was fairly easy with Hotglue. I already understood the workings of Hotglue and how to use it so all I had to do was the design work for the portfolio. Fortunately, I already had some previous branding design work from a previous design project, so I decided to use that instead:
After I had changed the background colour and adjusted my Logo according to the size and position I wanted it in, I started to create new pages for my portfolio based on the category. ‘Hotglue work’, ‘Design work’, ‘Coding’, ‘Mobile’, ‘Finished projects’ and ‘Reading materials’ pages. However, I later decided to scrap the Design work and Finished projects pages as I felt they weren’t really necessary.
After I had created those pages, I had to link all the pages to each other. This is when I created the text I wanted to use for the links in Photoshop and saved them as PNG’s. I did this because I wanted to use a specific typeface, but wasn’t able due to Hotglue’s limitations.
Using the link tool, I was able to turn these images in to links. It took a fairly long time, but then I had a fully functioning portfolio ready to display content.
Initially, my portfolio looked very different. I went with a different design scheme. The images for this first portfolio were created in Photoshop:
Pre-planing: